


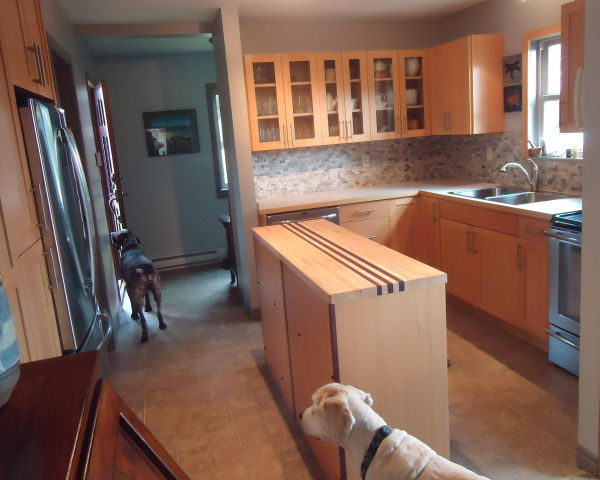
 The transformation of Tina’s kitchen from how it began to what it is now still amazes me. Now a large and functional space with lots of counter and plenty of storage, it features a custom island with a Barris Butcher Block on top made out of Canadian Hardrock Maple and South American Purple Heart.
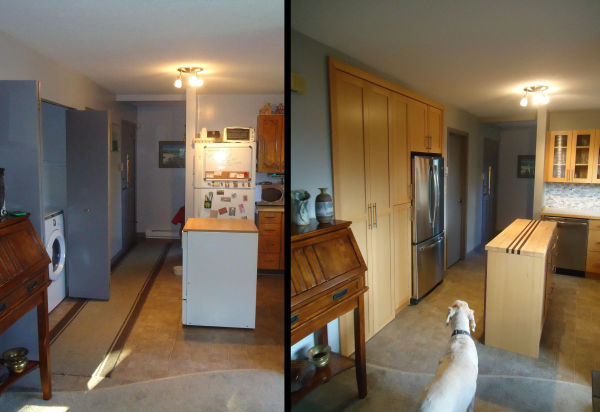
We were originally asked by Tina’s husband to come by his home and see if there was anything we could do with Tina’s tiny kitchen. They had owned their home for ten years and had always wanted to do something with the original teeny tiny space, but to this point, no one had a solution since expanding it in any direction was not possible.
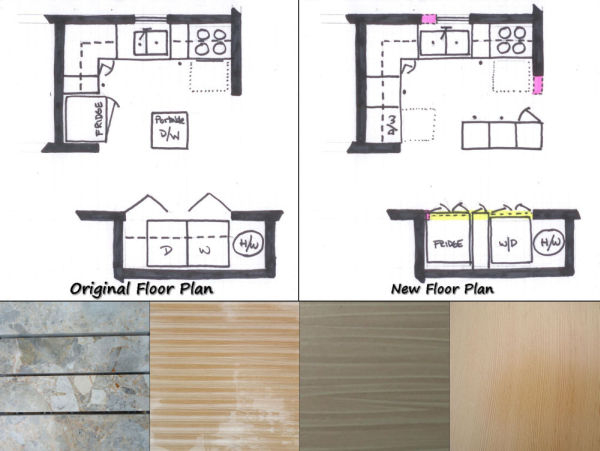 The original kitchen had only one foot of counter to the right of the sink and 18″ to the left, with only an additional 24″ around the corner – that was it! An extra two feet of counter was created with a portable dishwasher that stood in the middle of the room. WOW!
It only took me a few minutes to concoct a plan. Tear out the old closet that was holding the washer and dryer, stack them next to the hot water tank, move the fridge over to the other side of the opening and create a custom skinny pantry between them with extra storage above all three sections. With the fridge moved, there would now be a place for a built-in dishwasher on the main counter, and the portable unit could be replaced with a custom island that was only 20″ deep and 55″ long. Within the week, I had put together a sample board of Golden Panther marble for the back-splash, fluted glass for the glass doors, Rouched Linen laminate for the counters and Douglas-fir for the cabinetry.
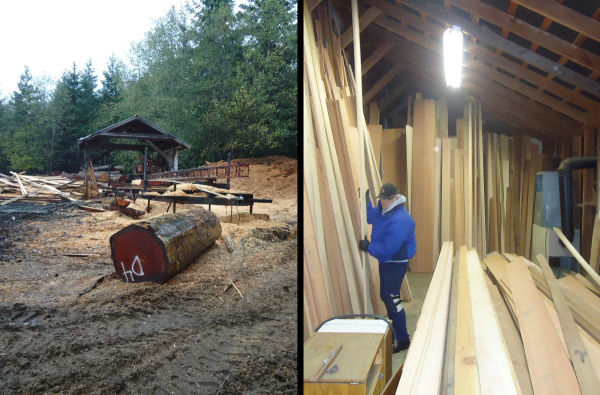 We love using Douglas-fir for cabinetry because it is a local product from a local mill. In fact, we order the wood from a sawmill that is located just half an hour south of us on Vancouver Island, between Courtenay and Campbell River. Here, blow-downs and farmed trees are milled, kiln dried and cut to size, making the wood we use for our designs sustainable and earth-friendly. We order all our wood boards over-sized so we can plane them to the exact dimension we like. This is something that is just not possible to do with store bought wood.
 Once in our shop, the wood was transformed into Tina’s new cabinetry, including the new pantry, kitchen cupboards and island. When the doors of the new pantry are shut, it is next to impossible to know that the laundry is contained behind the two tall doors. It just looks like a pantry wrapping around a fridge. When the doors are open and Tina is folding her laundry, the island creates the perfect work station for folding, but it also makes a great place to offload/load the fridge and/or it can be used for its actual purpose of giving Tina a cutting & baking station.
 The island was designed to be just 20″ wide so there would be an ideal 42″ of space on either side of it and on the end close to the dishwasher. This means that when the dishwasher, stove or fridge doors are open, it is not in the way. Previously, the 24” depth of the portable dishwasher meant that it had to be moved into the passageway when Tina was cooking and then brought back into the kitchen when she wasn’t. That’s what a 4” difference in depth can do; luckily the old portable was on wheels! Our new island can also be moved due to the felt pads that are on its base – this came in handy when Tina’s fridge finally arrived 3-1/2 months after it was ordered; needless to say, the kitchen had been completed long before that.
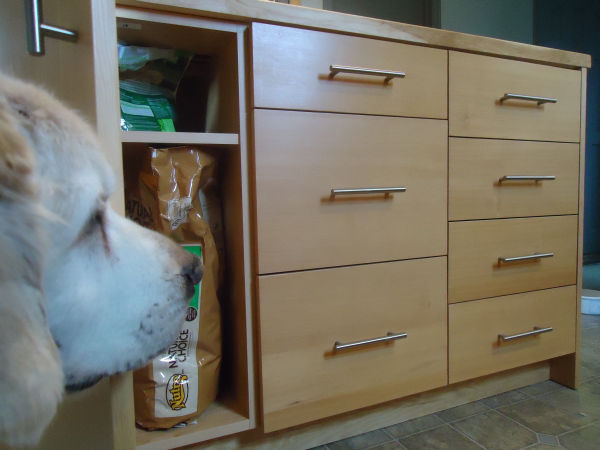 One thing I noticed in Tina’s original kitchen – and most kitchens for that matter – was that there was no space to store large bags of dog food, which meant that the bags were often left to sit out on the floor. So when designing the layout for the island, I included two banks of seven drawers, but also one door for the over-sized bags of dog food. I think Bogy approves.
Since the island is a feature of the room and is visible on all four sides, it was important to us to make it as beautiful from the back as it is from the front. 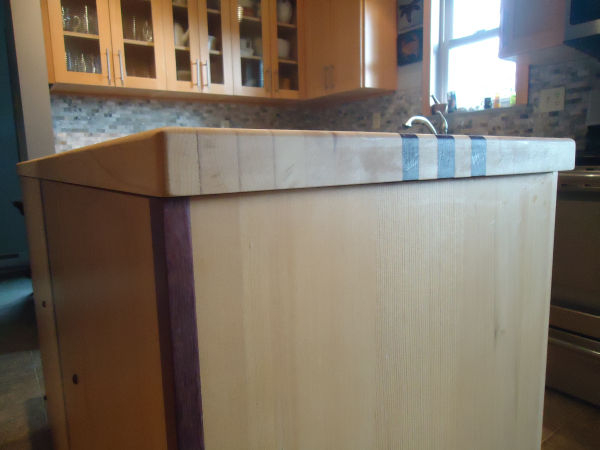 Since we were using Purple Heart pinstripes in the Barris butcher block, we decided it would be a nice touch to add Purple Heart detailing to the back corners as well as down the centre of the back panel. The use of three vertical stripes on the back as well as on the top creates a repeat pattern that is visually unifying as well as beautiful.
When Bruce (my awesome journeyman joiner husband) was building the Barris Butcher Block in our DesignHouseBC shop, he built it extra long so that he could create a cutting board from the off-cut. This means that Tina can keep her Barris Butcher Block surface smooth for baking – something she loves to do and wants to use it for – and use the complimentary cutting board for all her vegetable chopping. Both the Barris Butcher Block and the cutting board will need minimal upkeep; a rub down of food grade mineral oil every so often is all that is required.
With the pinstripe of the Barris Butcher Block being a predominant design feature in the new kitchen, we decided to repeat the linear aspect of the geometry in other aspects as well. The long brushed nickel handles were one way we repeated the linear look, as was the fluted glass we used in the bank of upper cabinets above the dishwasher.
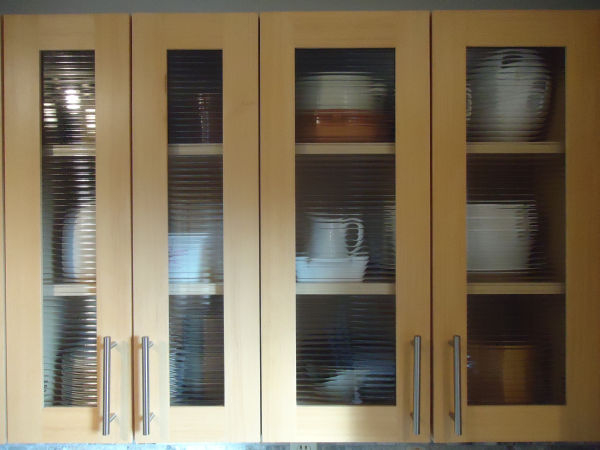 Usually when fluted glass is featured in kitchens, it is installed vertically, but we wanted to play off the pinstripes and chose instead to install the glass horizontally. It is much harder to do a horizontal installation because each flute in each door needs to line up perfectly, and when it does, it looks just amazing, especially with Tina’s Denby collection behind it, don’t you think?
Tina’s kitchen has been getting a HUGE response on my Google+ page and it’s been interesting reading and responding to the comments. I hope you like this kitchen as much as the readers on Google+ do.
If you like this kitchen transformation, you might also like Anatomy of a Kitchen Reno which I wrote about for Island Woman last year.
 Evelyn M, Associate of Interior Design
250-204-4417
www.EvelynM.com
Evelyn M Interiors/Design House BC
Evelyn M Fine Art


See all articles by Evelyn M